Converting a Weber Kettle Grill into a dedicated Competition-Level Smoker using the Pitmaster IQ110
The Pitmaster IQ 110 allows you to temporarily convert many types of charcoal grills into smokers with precision temperature control. But it takes a half hour, or so, to do the conversion, and what you end up with is not ideal for smoking. Instead, I decided to make a permanent smoker, and leave my high end Weber charcoal grill for what it was intended: Grilling. Below is how I did it, and some tips and techniques you won't find in the Pitmaster IQ110 installation guide.
Parts Needed:
Weber Silver Kettle Grill 22 1/2"
High Temperature HVAC Tape
Weber 7436 Replacement Hinged Cooking Grate or equivalent
Weber 7403 Char-Basket Charcoal Briquet Holders or equivalent
Weber 1201 Tool Holder or equivalent
In Addition you will need:
Aluminum foil
Foil Drip plans
High Quality Hardwood Charcoal (no lighter fluid)
Paraffin fire starter Packs
Wood chunks such as Apple, Cherry, Pecan and Hickory
Grill Brush
Basting Brush
Grill Gloves (optional)
Shop Vaccuum (optional)
Step 1: Acquiring the kettle grill
 The easiest way to start is by purchasing a Weber Gold 22 1/2" grill, which currently is about $150. That gives you the basic 22 1/2" kettle, plus the hinged grate, charcoal briquet holders, and tool holder, so you don't need to buy those separately, as above. Plus, you get the lid holder, which is very nice. You just need to buy the PitmasterIQ 110 -- currently $140 from Amazon.com -- and the HVAC tape, some of which is included in the Pitmaster kit. A roll of tape is only about $4 at most any hardware store.
However, the Gold Weber is a lot of money, and the best part of it, the ash catcher system, you won't even use. A better approach, I decided, was to borrow parts from my existing Gold equivalent, and buy a silver on Craigslist. A new 22 1/2" Silver will run you $100 currently, but you can get a slightly used one for less than $50 on craigslist if you are patient. Folks sell these things when they decide charcoal BBQing is a hassle, and they go get a gas grill, and their Weber sits unused. I got a barely used kettle for $40 this way. Be careful that the unit you buy is a 22 1/2" unit, not the cheaper 18 1/2" Weber Silver!!!
There are lots of grills that the Pitmaster system works with, but you must have the ability to close off all vents. An open vented system will not work. All gas grills are open vented, and none of them will work in this application. Don't even try.
Step 2: Converting the grill
Once you acquire a kettle, throw away several parts, including the ash catcher plate, which looks like a hub cap, and the cooking grate instelf. While you can use the existing grate, if you bought it used it is probably gross, and besides, you are better off with a hinged grate, which you can acquire for about $20 at a hardware store or online. Just makes sure you get the 22 1/2" grate. Alternatively, if you have another Weber, you can use the cooking grate from that one, and share among the two kettles.

 There are 3 vents on the bottom of the grill. You want to use the back vent for the IQ110. Buy the HVAC tape (or use what is included with the IQ110 kit), and cover the front two vents carefully and evenly with the tape, both inside and outside. Then close the ash catcher. Inside the grill, bend the v-shaped ash catcher plate covering the vent in the back to be used by the IQ 110 up to a 45 degree angle. Then with two vice grips, carefully flatten the top section a bit, and bend it down so that it is below the level of the charcoal grate. You want to maximize the airflow from that vent, while minimizing any possible leaks from the other two vents. Also, the raised ash catcher plate will somewhat protect the IQ110 vent from drips, while the other two give you additional insurance against air leaks and moisture getting to the HVAC tape. You also want this configuration of the three vents because the firebox will be in the front of the grill, and ash will fall between the two closed vents, and not into the IQ110 vent. Install the IQ110 into the back vent, as per the included instructions. Hang the IQ110 control box from the tool holder. Set it to "4".
 Next, you need to use aluminum foil to cover two thirds or so of the charcoal grate. There are two reasons for this. It prevents cold air from the IQ110 blower from cooling off the food. And it provides a drip tray, so that liquid doesn't enter any of the three bottom vents. Wrap the foil around several times. Note that I have also provided a drip edge on all sides -- additional insurance against moisture reaching the bottom vents of the kettle.
 The next step is to place the "Char-basket" for the coals at the front of the grill, sitting on top of the charcoal grate on the section that is not foil-covered. You can borrow this from your other grill if you have one, like me, or you can buy a set of two online, or at a hardware store. Or you can make your own. You just need a half-moon shape, and lots of holes for airflow.
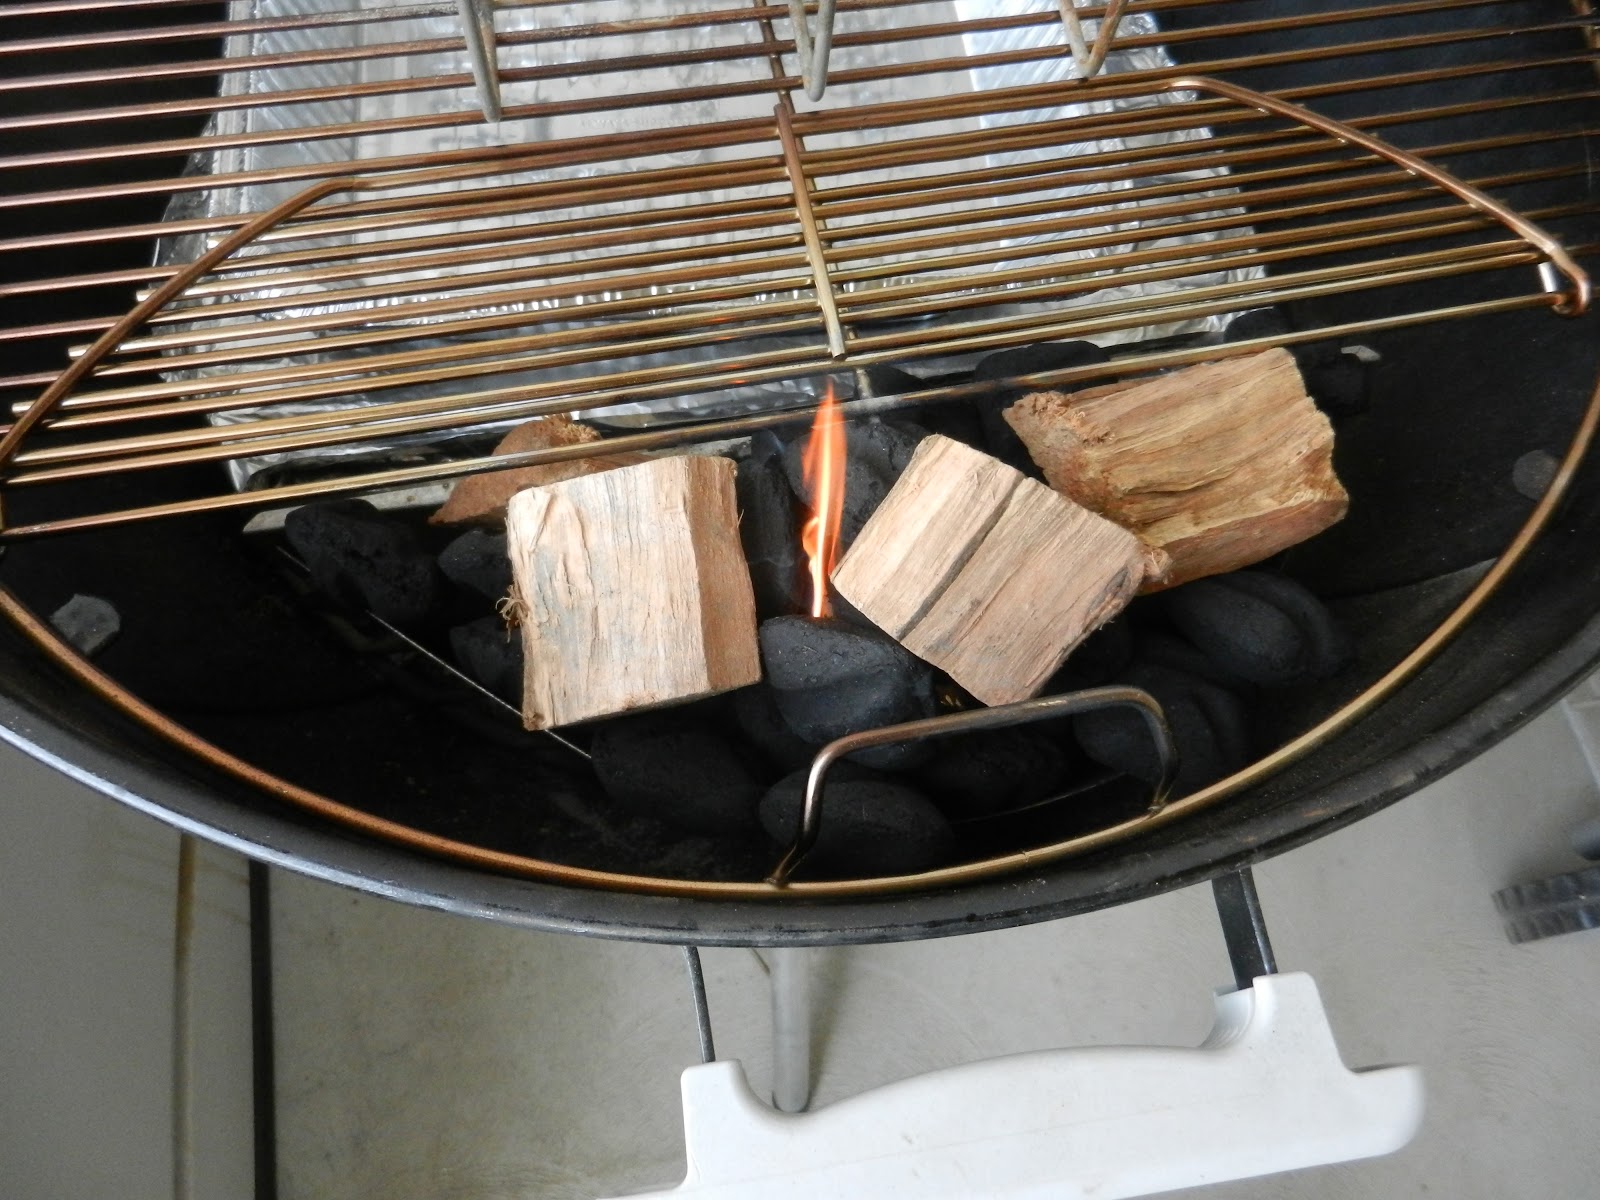
 Make sure you get good quality charcoal briquets. You don't want any of the "match light" type charcoal that is permeated with lighter fluid. Your charcoal is not going to be all the way lit when you start smoking, so it must be pure charcoal. For that reason, you also need paraffin starter packs like the one shown. Fill the basket with charcoal up to the top of the basket, and then top with the starter packet as shown.
  Now it is time for some flavor! Put the hinged cooking grate in place, and raise the front hinge. Now you see why the hinge is so important. You can build the firebox up above the level of the cooking grate. More wood/Charcoal means longer cooking times. With the IQ110 and a properly sealed grill, you will get 8 hours or more of cooking time without adding additional charcoal/wood. Pile more charcoal briquets, and your flavoring wood chunks on top of the paraffin starter pack, as shown. Your choice of wood will highly influence the flavor. I recommend you start with milder woods such as Apple and Cherry, and then maybe add a bit of Hickory or Pecan, depending on what you are smoking. Don't use Mesquite!!! I love to grill with Mesquite, but there are nasty chemicals that are not good for smoking applications.
 I highly recommend you place the tool holder to the side of the grill, not the front where the fire will be. You want to keep the unit as cool as possible. YOU MUST HANG IT FROM SOMETHING! It will simply not work in a horizontal position. That is why the Weber tool holder is ideal. Note I have included an aluminum drip pan below the cooking surface. You can also cook in the pan, sitting on the grate, but you won't get any smoke coming up from the bottom with this method. Still, it does keep all of the moisture where you need it.
You can use a rib rack, or other meat/vegetable holder, such as a vertical roaster, or a beer can. Please note where I have placed the temperature probe. It is clipped to the back of the grill, but the probe itself is not touching any metal. This is very important. I ran the probe cable around the grill to where the tool holder is located, and then down, to attach to the IQ110. That's it! You're ready to smoke!

Step 3: Lighting the Smoker

 If you saw the "Good Eats" episode with Alton Brown, and the IQ110, you can skip this part. The idea is to light a couple of the briquets, and a piece or two of wood, and then start cooking. It takes no more than 15 minutes to get the coals to this stage. This is why you can't use a chimney starter, or soak the coals in lighter fluid. The paraffin starter is perfect.
 You get a fire started, get your meat in, cover, and turn on the IQ110. Let the IQ110 bring the temperature up to where you need it. The IQ110 is much better at raising temperatures than lowering them. So if your fire is too hot to start, you will have nothing but problems. In the pictures below you can see that most of the coals and woods are unlit when I put the meat on. The IQ 110 will do the rest.
Step 4: Smoking

Most smokers have water holders in them. Most folks who smoke meat think the water is to keep the meat moist, and the inside of the smoker humid. No. The water is a heat sink, so it evens out the temperature, and prevents really hot temperatures from ruining the meat. We don't have to worry about that. Whatever meat you use will have plenty of moisture and the IQ 110 takes care of the temperature control, so you don't need water. As I cook various cuts of meat, I will add tips and photos to this section, so watch this space.
Step 5: Cleaning
If you followed my setup above, cleaning will be easy. Use a Shop-Vac to suck out all of the ash in the basket, and below the basket between the two plates of the ash catcher. You also need to clean the cooking grate, and whatever other racks or devices you used to hold the food in place. I do this by throwing both on my other grill, and let the flames from starting the charcoal on that burn off the attached food. Then I just scrape off the residue with a grill brush. But suit yourself.
Questions:
I will answer questions here, so watch this space too.